The Webhooks feature in Timely enables users to connect with other web applications seamlessly. With this feature, users can set up automated messages and updates to custom URLs. Webhooks enable the sending of data from Timely to any other application, allowing for efficient data sharing and integration across various platforms.
The Webhooks feature for Timely is considered a premium feature, and it will be counted towards your total number of Custom Features & Integrations.
In order to use Webhooks, you need to Enable this feature on the Features & Integration page. Once enabled, you can set up your webhooks by clicking on the 'Set Up' button. This will take you to the page where you can create your webhooks. At this stage, you will see that no webhooks exist, so let's create some!
In the top right corner, you will find the 'Create Webhook' button. Click on this button to create various types of Webhooks:
- Appointment Booked
- Appointment Canceled
- Appointment has been rescheduled
- Appointment status has been changed
- Customer Created
These types of webhooks correspond to the events in Timely that would trigger them to be sent.
![]()
Please note that, at this stage, you can only create a single webhook for each type. This means there can be only one 'Appointment Booked' webhook, one 'Appointment Canceled' webhook, and so on.
When configuring your Webhooks in Timely, you will have access to various settings:
- Name: This allows you to title your webhook for easy identification.
- Website URL: Enter the URL of your application where you want the webhook information from Timely to be sent. This enables you to integrate Timely data into other applications as needed.
Additionally, Timely offers a handy feature to test your Webhooks:
Send Test Webhook: This option sends dummy data to the specified URL. It provides a preview of the information that will be sent for each appointment triggered by the webhook. The following appointment details are included:
- Appointment Status
- Appointment Start Date
- Appointment Start Time
- Appointment Start Date and Time
- Appointment End Date
- Appointment End Time
- Appointment End Date and Time
- Appointment Price
- Customer Full Name
- Customer First Name
- Customer Last Name
- Customer Email
- Customer Phone
- Employee Full Name
- Employee First Name
- Employee Last Name
- Employee Email
- Employee Phone
- Service Category
- Service Name
- Service Duration
- Service Price
- Extras
- Location Name
- Location Address
- Location Phone
- Custom Fields
This allows you to ensure that the webhook is correctly configured to send the necessary information for your integration needs.
Please note that the data sent will be formatted according to the settings you have chosen in Timely. When using Webhooks, the information is transmitted via a POST request.
When setting up your Webhooks in Timely, you have the option to utilize a 'Verification Token'. Clicking on this button (next to the "Create Webhook" button) will prompt a pop-up window where you can view and copy your verification token.
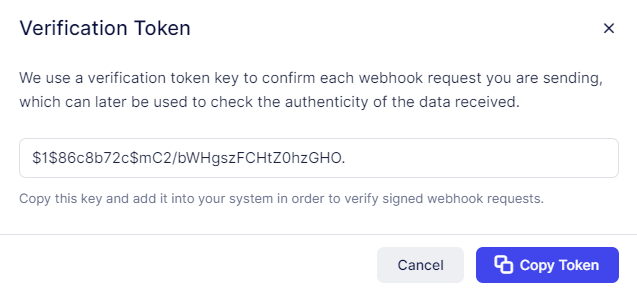
By utilizing the Verification Token, each webhook request sent from Timely to your application can be authenticated, ensuring that the data received is indeed originating from Timely. This token is included in the Authorization Header of the webhook request for added security.
As a testament to the versatility of webhooks, teams from Pabbly and KonnectzIT have successfully created integrations with Timely, showcasing the possibilities for seamless integration with external applications.